

Elden Ring Carian Stufy Hall
Unlike the other divine towers, the one in Liurnia isn't used to restore a nifty rune, but instead to observe the ![]() Cursemark of Death that progresses Ranni's questline. To access this divine tower, you'll need to get through the inverted version Carian Study hall — read on to notice how to access both versions of the study hall and reach the divine belfry.
Cursemark of Death that progresses Ranni's questline. To access this divine tower, you'll need to get through the inverted version Carian Study hall — read on to notice how to access both versions of the study hall and reach the divine belfry.
Acquiring the Inverted Carian Statue and Inverting the Written report Hall
Before you tin can admission the inverted version of the Carian Written report Hall, you'll demand to do the first part of Ranni'due south quest, by going to Nokron, Eternal City and acquiring the ![]() Fingerslayer Blade. Bringing the blade to Ranni and she'll give yous the
Fingerslayer Blade. Bringing the blade to Ranni and she'll give yous the ![]() Carian Inverted Statue. Then you tin can go to the Carian Study Hall in eastern Liurnia, and place the statue on the pedestal in the study hall's first room. This will invert the study hall and let y'all admission the Divine Tower of Liurnia.
Carian Inverted Statue. Then you tin can go to the Carian Study Hall in eastern Liurnia, and place the statue on the pedestal in the study hall's first room. This will invert the study hall and let y'all admission the Divine Tower of Liurnia.
Walkthrough
Notation that the path below starts with the inverted path, for people who desire to complete Ranni'due south questline without any sidetracking.
Inverted Study Hall
Annotation: Information technology'southward a adept thought to equip the  Carian Knight Shield if you grabbed it in Raya Lucaria, since it will be helpful with a couple of the enemies you face up in the report hall.
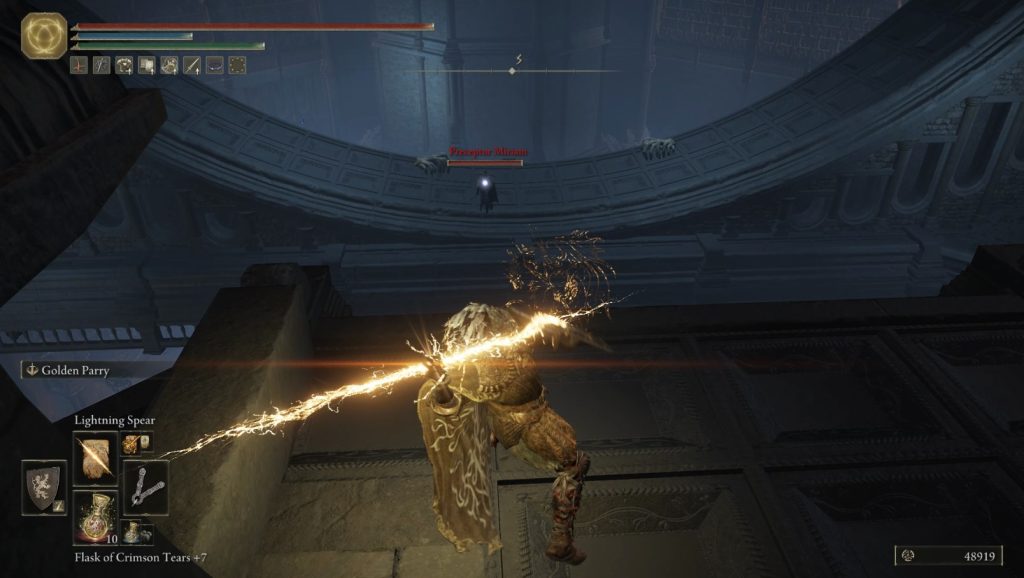
Once you've inverted the report hall, go up either fix of stairs to head south. You'll observe an lift shaft with no elevator. Slowly walk into the shaft to fall onto the ledge beneath. Continue around the ledge southward and jump into the window — there are 3 hands waiting for you just beyond, so take them out with ![]() Fire Pots or something ranged if you tin before hopping down. Walk forward and you'll see Preceptor Miriam standing on an inverted arch beyond from you. If you lot have a ranged attack, you can use it now to whittle her HP down (or even kill her) earlier standing.
Fire Pots or something ranged if you tin before hopping down. Walk forward and you'll see Preceptor Miriam standing on an inverted arch beyond from you. If you lot have a ranged attack, you can use it now to whittle her HP down (or even kill her) earlier standing.
If yous can't impale her from here, that's OK — her ranged attacks should hitting the floor below yous as long as y'all stay away from the edge. Go correct (west) and so make your way along the ledge southwest until y'all can't get any further. This adjacent part is dangerous, so read ahead before continuing . Drop down to the southeast (kill the hand down there before or right equally you drop), then get back west effectually the corner so Miriam tin can't shoot you lot with arrows. There are two more hands dorsum here in some narrow confines (and rolling tin end upward with you falling to your death), and then utilizing a shield or a quick weapon is ideal.
In one case the easily are dead, become east, hugging the wall and so you stay out of Miriam's line of sight, and and then get up on the arch just far plenty to aggro the spectral soldier with a spear and shield. Describe him back to where Miriam can't striking yous and take him downwardly, then try to selection off the hands while staying out of Miriam'southward sight. If this isn't possible, and you can't draw them down to safety beneath the arch, y'all'll need to fight them while dodging Miriam's spells — doable, but not ideal. Once both hands and the soldier are dead, you lot can engage Miriam — running towards her while moving diagonally will let you avoid her arrows. Once yous get her to virtually 20% HP, she'll teleport abroad, further to the southward.
Hop dorsum down to the due north and get around the ledge heading east — at the end of the ledge, you can jump up into the alcove there and snag the ![]() Mask of Conviction from the corpse. And so return to the inverted curvation and leap up. Be careful equally you motility south beyond the arch, as Miriam will be able to hit you with her Greatbow spell from where she teleported to. There should be some other soldier nearby — pull him with a projectile or by running most him, then draw him back to the far side of the arch so you tin can fight him without Miriam smacking you with spells.
Mask of Conviction from the corpse. And so return to the inverted curvation and leap up. Be careful equally you motility south beyond the arch, as Miriam will be able to hit you with her Greatbow spell from where she teleported to. There should be some other soldier nearby — pull him with a projectile or by running most him, then draw him back to the far side of the arch so you tin can fight him without Miriam smacking you with spells.
With the spectral soldier washed for, drop down from the arch to the ledge below and turn right, then sprint westward — at the spot where the ledge turns, there's a hand that can be hard to spot waiting in the corner. Deal with the manus and keep down the ramp until the final spectral soldier and paw aggro, so run back up and fight them away from the ramp to avert Miriam'due south spells. Once they're both dead, you can finish off Miriam, who has nowhere left to teleport to. Watch out for the hand hiding in the cobwebs behind Miriam .
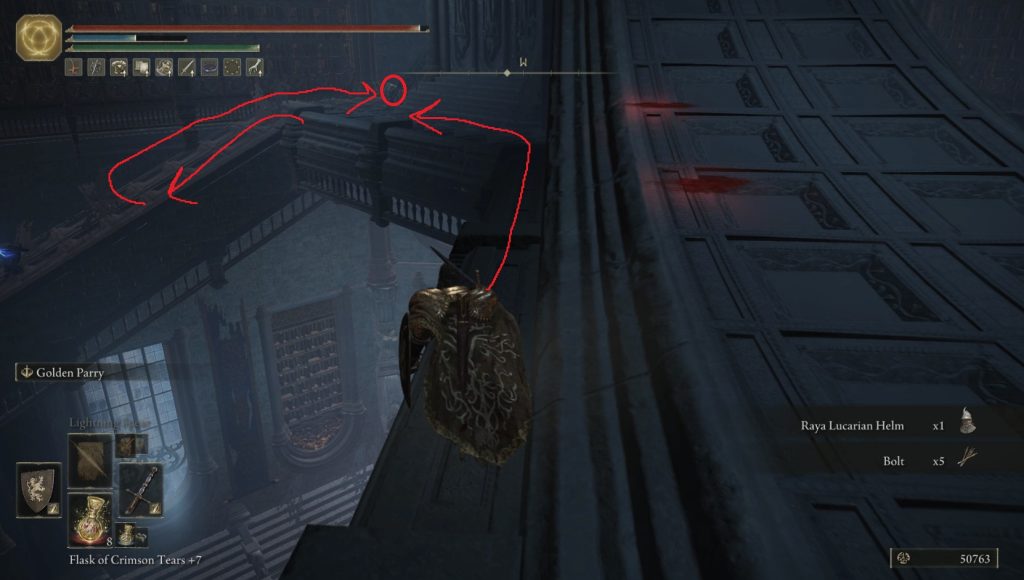
Miriam will drop the ![]() Lucidity sorcery upon decease, and and so you can continue following the ledge more often than not due east until y'all can't follow it whatsoever farther. At this point, driblet down to the northward onto the ledge below, then driblet onto any of the beams that run underneath the ledge. Find a beam that runs underneath the beam you're on, and then walk across them to the two corpses that hold x8
Lucidity sorcery upon decease, and and so you can continue following the ledge more often than not due east until y'all can't follow it whatsoever farther. At this point, driblet down to the northward onto the ledge below, then driblet onto any of the beams that run underneath the ledge. Find a beam that runs underneath the beam you're on, and then walk across them to the two corpses that hold x8 ![]() Glinstone Firefly and x2
Glinstone Firefly and x2 ![]() Holyproof Dried Liver. Finally, follow the beams until you can drop down onto the lift, and so take it "downward" to the top of the tower. Once the lift stops, go east and open up the doors to head outside onto the bridge.
Holyproof Dried Liver. Finally, follow the beams until you can drop down onto the lift, and so take it "downward" to the top of the tower. Once the lift stops, go east and open up the doors to head outside onto the bridge.
Make sure you grab the Liurnia Tower Span site of grace on your left as you leave the written report hall, and then mount Torrent and ride eastward. A Godskin Noble will appear in the center of the bridge — you can choose to ride past him, simply he drops his armor set on death, so if you're into looking icky you may desire to slay him. (He only drops ![]() 4810, so it's non worth killing him only for the runes.)
4810, so it's non worth killing him only for the runes.)
How to Shell the Godskin Noble
If y'all choose to fight him, stay on Torrent and fight him the mode you fight near open-earth bosses: ride close plenty to trigger an attack, ride out of range, then ride dorsum in and get a few hits in equally his attack finishes . If you want to be greedy, yous can instead ride towards him, tap dart equally you close the distance, and attack every bit you ride past (and so circle back after his assail finishes for another attack of your own). The merely consequence with this is that he has a few fast attacks that tin can hit you lot equally you ride by — that's why the safer strategy is to trigger an attack and avert it earlier counterattacking.

Stay near one of the platforms throughout this fight — when he does his rolling attack (telegraphed by him puffing up and turning sideways), put the wall of the platform between him and you so he rolls into the wall.

The Divine Tower
Once you've killed (or ridden past) the Godskin Noble, you tin can go all the way east across the bridge, open the door, and ride the elevator up the tower. Catch the site of grace one time you get off the elevator, and and then make your way up the many flights of stairs to the top of the tower, where you'll find what is presumably Ranni's real trunk. Take the ![]() Cursemark of Decease and the
Cursemark of Decease and the ![]() Stargazer Heirloom from her corpse. At this point, yous can continue Ranni's quest by teleporting to Ranni's Rise (or whatever your closest site of grace is to the Three Sisters in Liurnia), and then going into the newly-opened Renna'south Ascension and taking the waygate in that location. However, this walkthrough will now cover clearing the uninverted version of the Carian Study Hall.
Stargazer Heirloom from her corpse. At this point, yous can continue Ranni's quest by teleporting to Ranni's Rise (or whatever your closest site of grace is to the Three Sisters in Liurnia), and then going into the newly-opened Renna'south Ascension and taking the waygate in that location. However, this walkthrough will now cover clearing the uninverted version of the Carian Study Hall.
Study Hall
Teleport back to the Study Hall Entrance site of grace, and collaborate with the pedestal again to reset the written report hall to its original orientation. Then go e up either set of stairs and ride the ladder up. While yous ride the elevator, it's a practiced idea to equip the Carian Knight Shield if you haven't yet.
One time the elevator stops, head through the doorway and turn right, then continue to the southwest to notice a corpse with a ![]() Golden Rune [3] on information technology. You tin can ignore the hands that lurk on the ceiling, since they won't drop down. However, two spectral nobles volition spawn side by side to y'all when you loot the corpse, then be ready for them. Now caput back the way yous came and and so go up the stairs to the east. In one case you get partway upwardly the stairs, start running, and run to the height, then plow right and await just around the corner from the stairs . Miriam can't hitting y'all here, and the two nobles that appear will slowly make their way to you lot:
Golden Rune [3] on information technology. You tin can ignore the hands that lurk on the ceiling, since they won't drop down. However, two spectral nobles volition spawn side by side to y'all when you loot the corpse, then be ready for them. Now caput back the way yous came and and so go up the stairs to the east. In one case you get partway upwardly the stairs, start running, and run to the height, then plow right and await just around the corner from the stairs . Miriam can't hitting y'all here, and the two nobles that appear will slowly make their way to you lot:
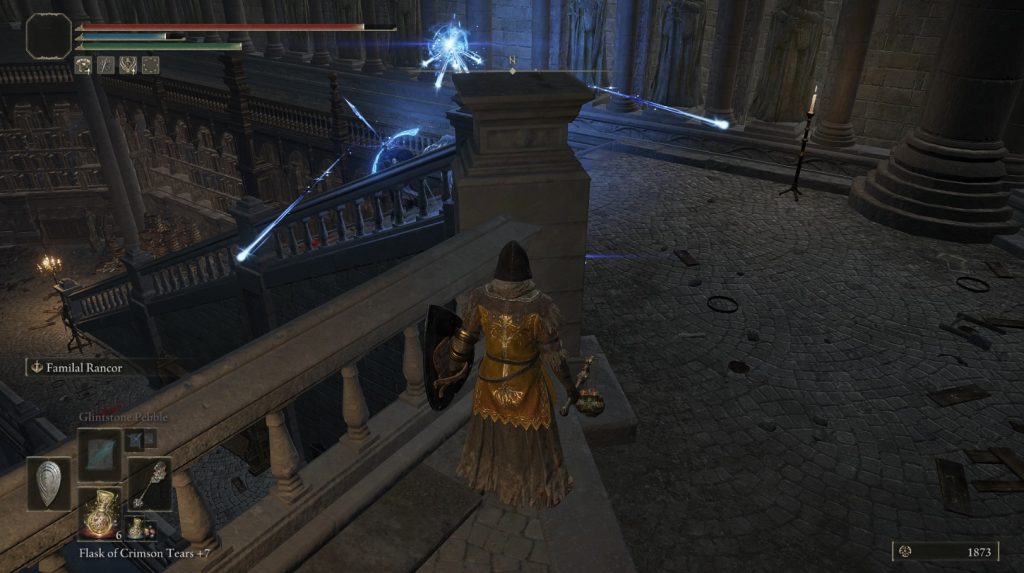
Impale the two spectral foes while staying in cover — endeavor to stand a little ways away from the railing and then Miriam's splash impairment doesn't striking y'all through the rail. Once the first two spectral nobles are down, turn around and go west across the bridge. Numerous spectral foes will spawn, but they are vulnerable every bit they appear, then take them down on spawn. Proceed all the way across the span, killing as you go, and then plow left and head up the stairs. Same bargain up here — enemies will spawn, and you'll impale them. When you get to the far side of this upper platform, two enemies will spawn behind yous , so be prepared.
What we've done is articulate all the adds that Miriam would have hid behind if we fought her on the stairs — if you dice fighting her, your best bet is to repeat this whole process again. Sometimes, Miriam won't behave and will follow yous up the stairs, but if you stand as indicated in the prototype above and await, she should end up partway downwardly the stairs and stay at that place until you engage her.
Now run back downward to where Miriam is probably yet shooting arrows into the handrail of the stairs, and engage her. Ideally, you'll run diagonally at her and/or coil to avoid her arrows, merely the Carian Knight shield will cake virtually of the impairment, so y'all can use that if yous aren't comfortable dodging her bow assail — however, you'll nearly probable end up staggered. She will also sometimes cast ![]() Magic Downpour, which volition float above her head and spray projectiles — back off when she does this and become ready to dodge her arrows. If she charges upwards her bow while y'all're close, run behind her and try to get off a backstab.
Magic Downpour, which volition float above her head and spray projectiles — back off when she does this and become ready to dodge her arrows. If she charges upwards her bow while y'all're close, run behind her and try to get off a backstab.
After doing a bit of damage to her in her first location, she'll teleport to the far end of the span. Go later her again, and once she'southward taken a flake more than damage, she'll teleport to the platform at the meridian of the stairs. Engage her a tertiary time on the platform, and she'll disappear when she'due south close to death. Grab the  Carian Glintstone Staff from the nearby chantry, and then go through the doorway on the southeastern side of the platform and then up the lift.
Go off the elevator and head out onto the balustrade that rings the room, and become left to close the distance with Miriam nonetheless again. Annoyingly, she will teleport abroad — this doesn't terminate her from channeling her spells, nevertheless, so be careful. Keep making her teleport until you reach a ladder (a few spectral nobles will spawn nearby). Chase her once more until she teleports again (you'll have to avoid another spectral foe), and so go back to the ladder and climb it. You'll notice yourself on some wooden beams — caput across them towards Miriam, advisedly killing the rat on the beam alee without falling off . Use your shield or a ranged set on!
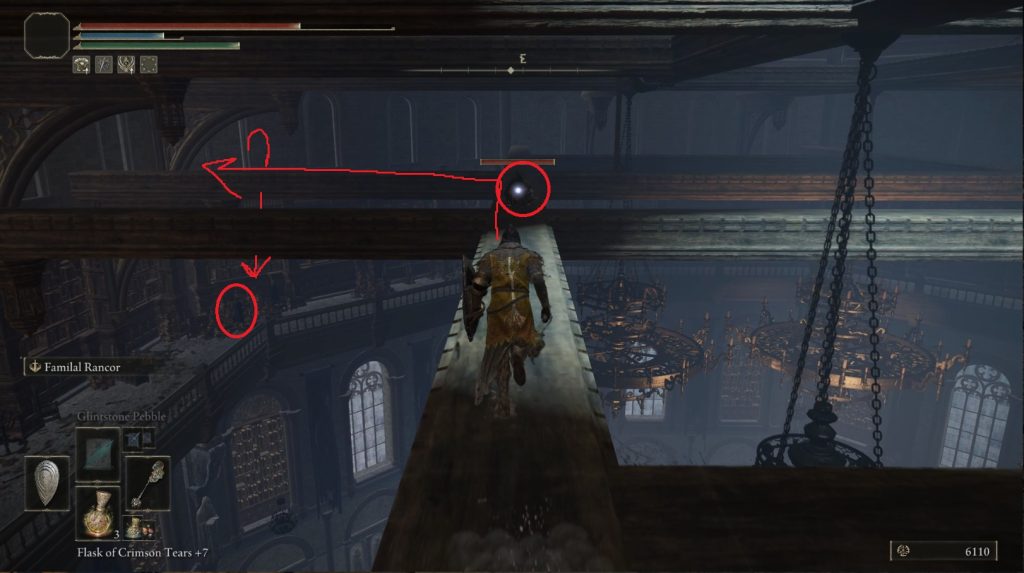
If y'all're a ranged character, you can shoot at Miriam from above, otherwise you'll demand to bound downwards and finish her off. She shouldn't teleport anymore, but if she does, only get back to the ladder and notice her via the beams once again. Miriam will drib her ![]() Magic Downpour sorcery when she dies, and you can and then circle the balcony to discover a
Magic Downpour sorcery when she dies, and you can and then circle the balcony to discover a ![]() Golden Rune [4] on a corpse — naturally, a bunch of mobs will appear when you approach the corpse.
Golden Rune [4] on a corpse — naturally, a bunch of mobs will appear when you approach the corpse.
Next, go back up the ladder ane concluding time, and follow the beam you're on heading east — look right after reaching the 3rd perpendicular beam, and you'll find a ladder. Climb upwards and await southwest — a corpse there holds the ![]() Cerulean Seed Talisman. Once you lot grab it, you're all done hither! Of course, there are a few rats between you and it, so approach advisedly and used ranged attacks if possible.
Cerulean Seed Talisman. Once you lot grab it, you're all done hither! Of course, there are a few rats between you and it, so approach advisedly and used ranged attacks if possible.
Now you tin can teleport to Ranni's Rise (or whatever your closest site of grace is to the Three Sisters in Liurnia) and then enter Renna's Rising, which opened once y'all picked up the Cursemark. After climbing the ladder, wait across the belfry to find a chest with Renna'southward outfit. At the peak of the tower is a waygate that volition take y'all to Ainsel River (Main) — caput through to continue Ranni'southward quest!

Elden Ring Carian Stufy Hall,
Source: https://eip.gg/elden-ring/guides/carian-study-hall-divine-tower-of-limgrave-walkthrough/
Posted by: deveautherplis.blogspot.com
0 Response to "Elden Ring Carian Stufy Hall"
Post a Comment